Getting started
Build your profile: add, arrange & fill modules
How to add modules, fill them with content and arrange your profile page with drag & drop — the complete editor workflow.
You build your profile page in the editor out of individual building blocks — the modules. Each module is a tile in your grid: bio, experience, links, projects and much more. This article walks you through the whole flow: adding modules, filling them with content and arranging them freely.
Open the editor
In your dashboard, click Profil bearbeiten (Edit profile). You land in the editor, where you put everything together.
At the top you'll see a bar with two modes:
- Inhalt & Layout (Content & layout) — here you add modules, fill them and arrange your grid.
- Design — here you set light/dark, accent color, style and corners. Learn more under Design & themes.
Both modes share the same draft and the same Speichern (Save) / Veröffentlichen (Publish) — so you don't have to save your design separately.

Tip: You don't have to start from scratch. Use Vorlagen (Templates) to begin with a ready-made layout — learn more under Templates. Or let your résumé be turned into modules automatically via CV import.
Add a module
- Make sure the mode is set to Inhalt & Layout.
- Pick the tab at the top where the module should land (learn more under Tabs).
- Click Hinzufügen (Add — the + icon).
- In the Section hinzufügen panel, the modules are sorted into four categories:
- Beruf & Ausbildung (Career & education — e.g. Experience, Education, Projects)
- Fähigkeiten & Kenntnisse (Skills & expertise — e.g. Skills & Tools, Languages)
- Profil & Inhalte (Profile & content — e.g. Bio, Links, Social Media, Contact)
- Individuell (Custom — e.g. text field, image, gallery, blank areas)
- Click a module — it drops straight into the first free slot of the active tab.
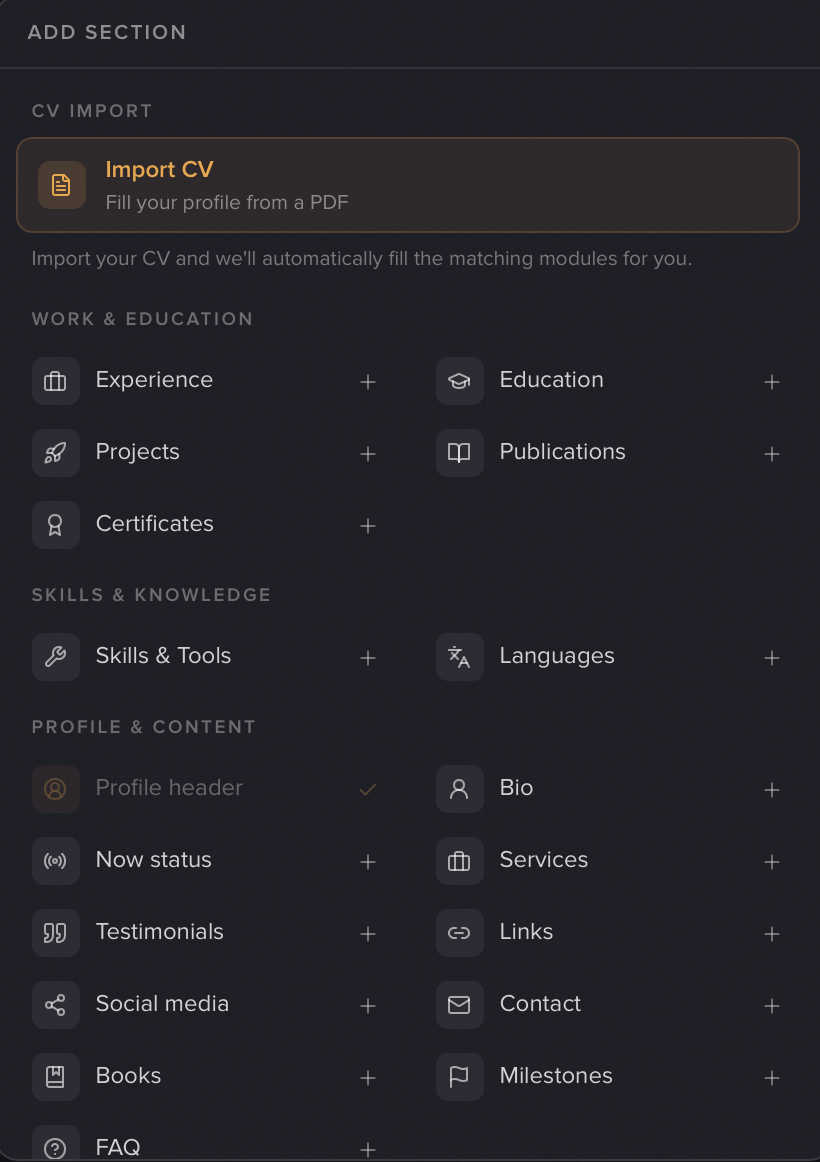
Most modules can only appear once per profile: if one is already there, it shows a checkmark and is greyed out. A few modules can be used multiple times — text field, image, gallery, embed, plus the placeholders Kleiner Abstand (small spacer) and Leerer Bereich (blank area). You can have one Profil-Header per tab.
You'll find a full overview of every building block under All modules.
Note: Some modules (e.g. gallery, embed, text field) are Premium. During the current test phase they're unlocked for everyone for free — but the marking stays in place.
Fill in your content
An empty tile still needs content:
- Click the tile (or use its Bearbeiten / Edit button).
- The matching editor opens, e.g. "Bio bearbeiten".
- Fill in your fields. For list modules you add entries via a "… hinzufügen" button, reorder them with the arrows and delete them with the trash icon.
- Close the window with Fertig (Done).
Note: Empty modules do not yet appear on your public page. The editor marks them with an amber border and the hint "Noch leer, erscheint so noch nicht auf deiner Seite." (Still empty, won't appear on your page yet). As soon as there's content, the module becomes visible.
Arrange & resize
On desktop
In Inhalt & Layout mode your grid is three columns wide:
- Move: Grab a tile by its header (the strip at the top with the grip icon) and drag it to a new spot.
- Resize: Drag the bottom corners (left or right) of the tile. It snaps to whole rows and 1–3 columns.
- When you let go, the grid compacts automatically — no gaps are left behind.
Tip: Embeds always snap to a square (1×1, 2×2 or 3×3).
On mobile
On a phone the 2-D grid isn't active. Instead you see a single-column list of the active tab's modules:
- Use the ▲ (Nach oben / Move up) and ▼ (Nach unten / Move down) arrows to change the order.
- Tap a row or Bearbeiten to edit content, or the × to remove it.
This order is your own and independent of the desktop grid — it only sets the reading order on small screens.
Insert dividers & spacers
To break your page into sections visually, there are a few helpers:
- Trenner (divider, Premium): on desktop, hover the gap between two rows of tiles — a round + appears there. Click it and choose Horizontale Linie (horizontal line) or Linie mit Text (line with text). Dividers are deliberately not in the Hinzufügen panel — only via this gap. (Free during the test phase.)
- Kleiner Abstand (small spacer): invisible whitespace on the public page.
- Leerer Bereich (blank area): an empty grid cell to shape your layout.
You'll find the spacer and blank area in the Hinzufügen panel under Individuell; neither has its own editor — you simply drag them to the size you want.
Save, preview & discard
While you work, the bar shows Ungespeicherte Änderungen (Unsaved changes). You have three options:
- Speichern (Save) stores your draft privately. Important: this does not change your public page yet — it keeps showing the last published version.
- Vorschau (Preview) saves briefly and opens your page in a new tab — exactly as visitors would see it.
- Verwerfen (Discard) reverts all unsaved changes to the last saved state (with a confirmation prompt).
When everything looks right, continue with Veröffentlichen (Publish). You'll find the full flow including going live under Publishing & going live.
Note: Only Veröffentlichen makes your current state public. Speichern alone just keeps it as a draft.
Related articles
All modules explained
Every module on your profilo page at a glance – what it shows, the fields it has and which ones are Premium.
Templates & saved layouts
Start from a ready-made template instead of a blank page, and save your own layouts to switch between views anytime.
Publish & go live
How to make your profilo public — the difference between Save, Preview and Publish, explained simply.